• Contact Kim
  • Stay Connected
  • Shop Printables
  • Nav Social Menu

    • Facebook
    • Instagram
    • Pinterest
    • Twitter

Salvaged Living

Easy DIY home decor and craft projects for budget home decor

  • Home
  • Meet Kim
    • About KIM
    • Get Kim’s Look
    • Kim’s Bookshelf
    • Kim’s Home Tour
    • Get The House Look
    • Disclosures
  • DIY Projects
  • Faith
  • Home Decor
  • Grow Your Creative Business
    • Grow Your Creative Business Course
    • One on One Business Consulting
  • Classes
Home » DIY Projects » Men’s Necktie to Tassel Necklace

DIY Projects Lifestyle

Men’s Necktie to Tassel Necklace

This post may contain affiliate links.

I have a thing for men’s neckties. I especially love the out of date vintage neckties that have funky colors and loud patterns, but you could use any old tie for this necktie upcycle.

When I see neckties at thrift stores and garage sales I typically buy a few and try to keep them in the same color family so I can use them together on projects. Recently I found a few holiday neckties and scooped them up too. An old necktie will set you back 50 cents to a dollar, way less than you can buy or find beautiful scraps of fabric for anywhere else. Especially silk! Here is my latest haul plus a few I had already in my stash. I listed a few more necktie projects I’ve done at the bottom of this post!)How to make old neckties into precious jewelry. This no sew necktie craft will recycle those out of style thrift store neckties into a cute tassel necklace on a serious budget. #diyjewelry #upcycleidea #vintagestyle #necktieaccessory #fashiononabudget

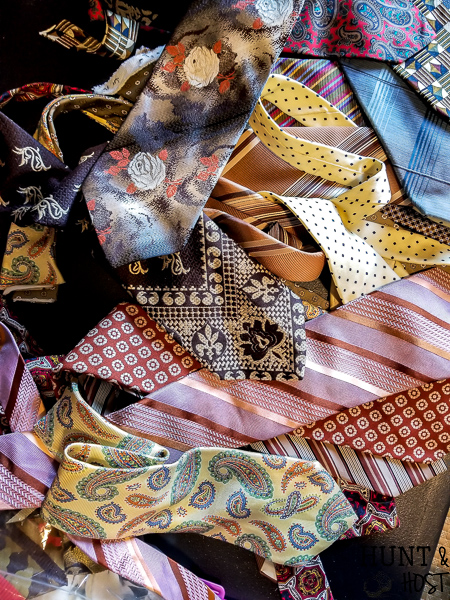
After seeing some cute tassel necklaces around in stores for way more than I was willing to pay, I knew an easy (not to mention budget friendly) DIY was at hand. Real quick – are you new here? If so WELCOME! I love new friends, be sure to say hi in the comments and sign up to get the latest projects ASAP (not to mention a free print every month!)

Supplies for Men’s Necktie Tassel Necklace:

Old neckties

Lobster Clasp ( I used 21 mm clasps)

Necklaces (the ones you see here are from my store, except the pearl one, it’s thrifted)

Jewelry Wire

Pliers

Scissors

Ruler

Iron – the is the BEST IRON EVERHow to make old neckties into precious jewelry. This no sew necktie craft will recycle those out of style thrift store neckties into a cute tassel necklace on a serious budget. #diyjewelry #upcycleidea #vintagestyle #necktieaccessory #fashiononabudget

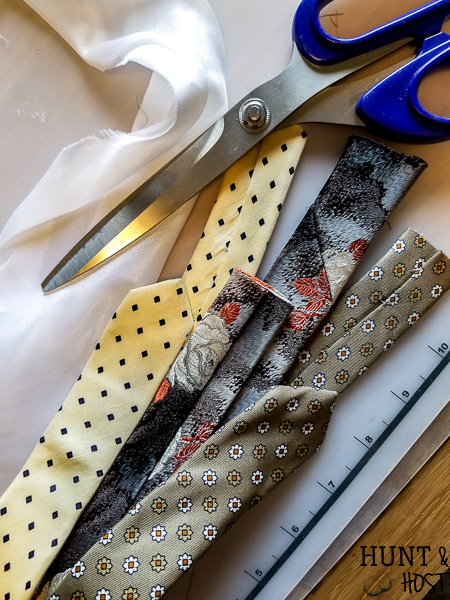
Here is the step by step breakdown of how to make stylish tassel necklaces from vintage men’s ties! 

  1. The written instructions are here, but I also did this live on Facebook and you can watch the replay here. 
  2. Gather old ties, you could even use some special ones from family members, like your grandfather’s old ties or may a favorite uncle, brother or raid your husband’s closet. Thrift stores and resale shops always have a ready supply on hand.
  3. Deconstruct the neckties. With scissors gently cut the threads down the back side, opening up the tie and taking the insides out. Sometimes the insides are great material to use for projects too. I used the inside of a tie with the brown necklace you see here!
  4. Cut off the parts you won’t be using like the lining and form material.How to make old neckties into precious jewelry. This no sew necktie craft will recycle those out of style thrift store neckties into a cute tassel necklace on a serious budget. #diyjewelry #upcycleidea #vintagestyle #necktieaccessory #fashiononabudget
  5. Iron your material to get the creases out the best you can, some will be permanent, but don’t worry, you won’t see them.
  6. Decide how long you’d like your tassel. I made mine to be an average of 7 inches long, so I cut a rectangle out of the tail end (skinniest part) of the tie that was 14 inches long and as wide as the tie would allow (usually 3-4 inches). By using the thin part of the tie you can use the big part for other crafts!
  7. Next cut the rectangle into long strips approximately 14 inches long and 1/2 to 3/4 inches wide. You do NOT have to be exact on these and you can make your tassel longer or shorter.
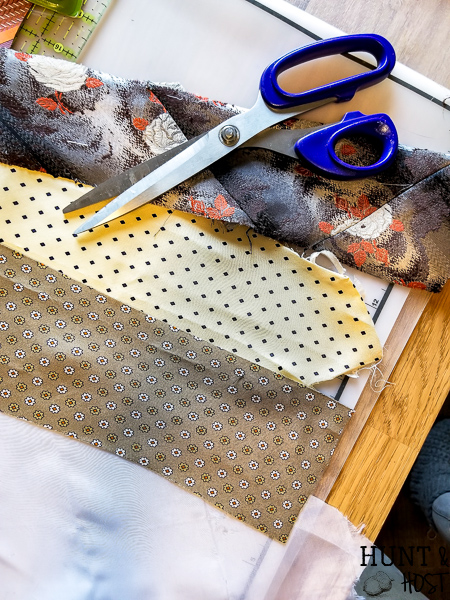
  8. Repeat these steps with 2 to 4 different neckties that have a coordinating color scheme.
  9. Here is where you can get extra creative…what else can you add to your tassel? You can use old sheets, tulle, string beads, feathers, sequins, solid material or whatever else you have on had to add an extra layer of dimension and interested to our outfit. Just stay in line with your fashion style. Cut 14 inch lengths of whatever else you choose.
  10. Lay the strips on top of each other in random order, mixing the patterns.How to make old neckties into precious jewelry. This no sew necktie craft will recycle those out of style thrift store neckties into a cute tassel necklace on a serious budget. #diyjewelry #upcycleidea #vintagestyle #necktieaccessory #fashiononabudget
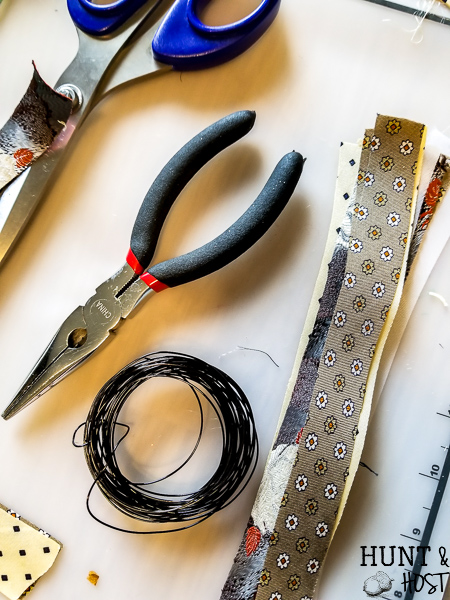
  11. Cut a few inches of jewelry wire and wrap it around the center point of you strips. Tighten it with pliers. You can get different colors of jewelry wire, so select what best fits your color palette.How to make old neckties into precious jewelry. This no sew necktie craft will recycle those out of style thrift store neckties into a cute tassel necklace on a serious budget. #diyjewelry #upcycleidea #vintagestyle #necktieaccessory #fashiononabudget
  12. Loop one end of the wire through a jewelry lobster clasp and wrap tight, bringing the joined wires around to the underside of the strips.How to make old neckties into precious jewelry. This no sew necktie craft will recycle those out of style thrift store neckties into a cute tassel necklace on a serious budget. #diyjewelry #upcycleidea #vintagestyle #necktieaccessory #fashiononabudget
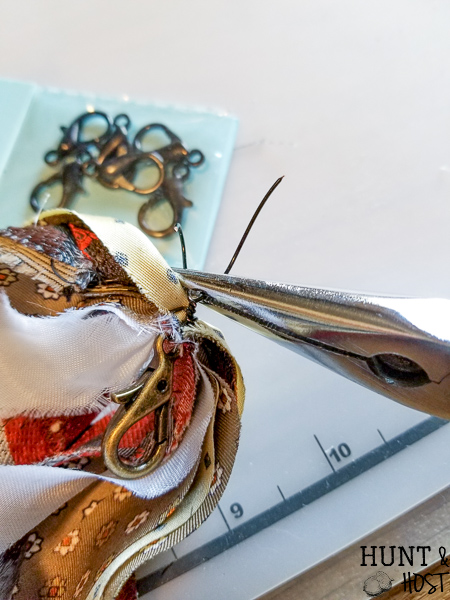
  13. Cut a 3 to 4 inch length of wire. Fold your strips in half at the newly added clasp and get them laid around in a nice pattern then wrap the wire around them tightly. Tighten by pulling one end of the wire with pliers while holding the other end. Wrap the wire around the neck of material multiple time to create a strong hold that looks good.How to make old neckties into precious jewelry. This no sew necktie craft will recycle those out of style thrift store neckties into a cute tassel necklace on a serious budget. #diyjewelry #upcycleidea #vintagestyle #necktieaccessory #fashiononabudget
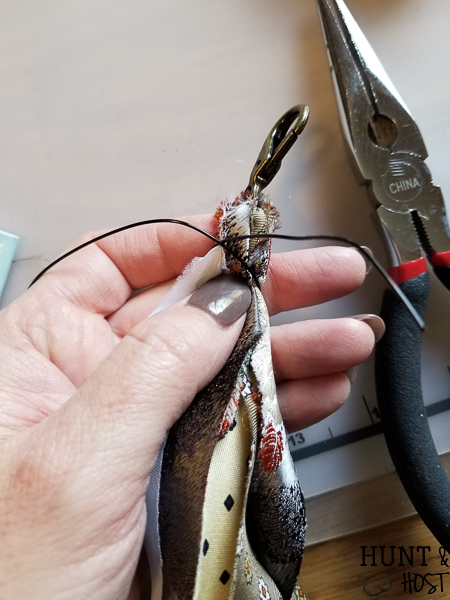
  14. Twist the wire ends together and tuck into the tassel.
  15. Hold up your tassel and trim the ends so they are all neat and even then you are done! How to make old neckties into precious jewelry. This no sew necktie craft will recycle those out of style thrift store neckties into a cute tassel necklace on a serious budget. #diyjewelry #upcycleidea #vintagestyle #necktieaccessory #fashiononabudget

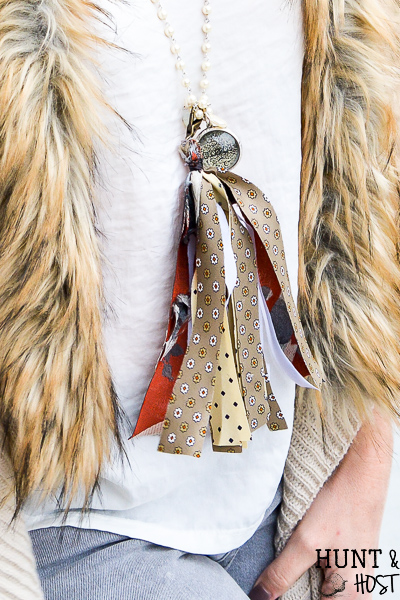
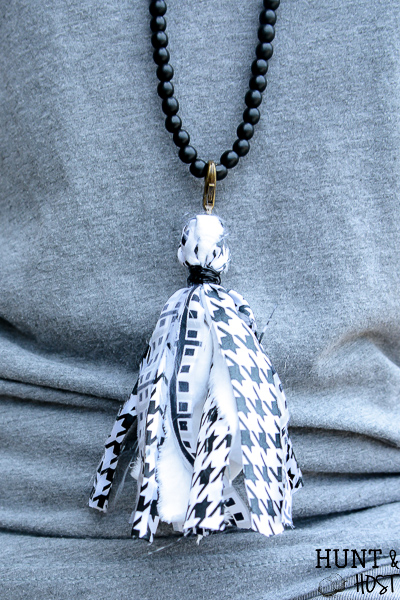
The thing I love about making this necklace on a lobster clasp is now you can add your tassel to any necklace you’d like, switching colors and styles for the most mileage. I even found a great “pearl” necklace with jewels for $1 at the resale shop and I love how it looks with a tassel attached.How to make old neckties into precious jewelry. This no sew necktie craft will recycle those out of style thrift store neckties into a cute tassel necklace on a serious budget. #diyjewelry #upcycleidea #vintagestyle #necktieaccessory #fashiononabudget

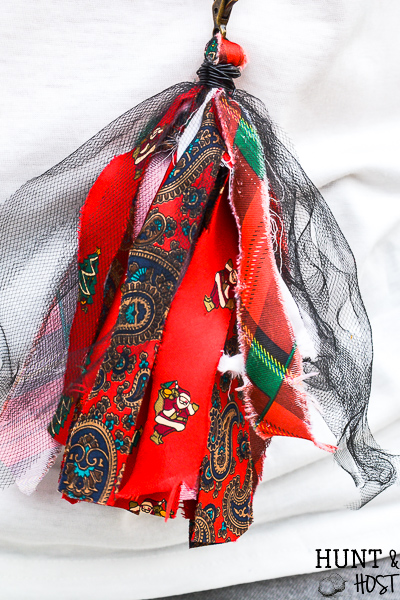
So what do you think? I LOVE them and especially love them for a fun holiday style.How to make old neckties into precious jewelry. This no sew necktie craft will recycle those out of style thrift store neckties into a cute tassel necklace on a serious budget. #diyjewelry #upcycleidea #vintagestyle #necktieaccessory #fashiononabudget

You can dress them upHow to make old neckties into precious jewelry. This no sew necktie craft will recycle those out of style thrift store neckties into a cute tassel necklace on a serious budget. #diyjewelry #upcycleidea #vintagestyle #necktieaccessory #fashiononabudget

or wear them casual with a cute tee.How to make old neckties into precious jewelry. This no sew necktie craft will recycle those out of style thrift store neckties into a cute tassel necklace on a serious budget. #diyjewelry #upcycleidea #vintagestyle #necktieaccessory #fashiononabudget
Possibilities are endless with this necktie re-purpose!!! Have fun and show me what you make, I love seeing your ideas. Don’t forget to pin this before you go so you will have this tutorial handy when you stumble on all those old ties! 🙂How to make old neckties into precious jewelry. This no sew necktie craft will recycle those out of style thrift store neckties into a cute tassel necklace on a serious budget. #diyjewelry #upcycleidea #vintagestyle #necktieaccessory #fashiononabudget

Here are some other fun projects using men’s vintage neckties:

Necktie Fall Wreath

Patriotic Pillow Cover

Pet Bow Tie

Necktie Word Art

Blessings, Kim from Hunt & HostConnect more here:

E-mail Subscription / Pinterest / Facebook / Instagram / Grow Your Creative Business


25 Comments

Stay connected

Don't miss out on the latest!

By being included in our newsletter delivery, you consent to receive new post updates and occasional promotional emails related to the Salvaged Living family. We promise not to over stuff your inbox!

Previous Post: « How to Make Your Own Vintage Style Laundry Cart
Next Post: Thrift Store Artwork into DIY Typography Wall Art »

Reader Interactions

Comments

  1. Kelly Howard says

    January 24, 2019 at 5:54 AM

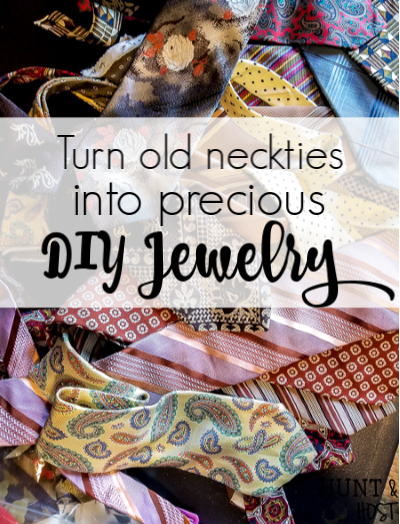
    Or hook them on my purse or my Happy Planner! Goodwill here I come!

    Reply
    • Kim at Hunt and Host says

      January 28, 2019 at 10:27 AM

      That would be precious!!! or on a bag…so many ideas

      Reply
  2. Montee Wellman says

    January 24, 2019 at 7:36 AM

    Great idea!

    Reply
    • Kim at Hunt and Host says

      January 28, 2019 at 10:27 AM

      thank you and best of all they are pretty simple to make!

      Reply
  3. Kim says

    January 24, 2019 at 7:43 AM

    I love your ideas going to make them!!!!! Thanks kim

    Reply
    • Kim at Hunt and Host says

      January 28, 2019 at 10:28 AM

      have fun!!! and thank you

      Reply
  4. Gilmer Gal says

    January 24, 2019 at 9:25 AM

    These are so cute!! Can do a lot with them – I would make some and string them up for a tassel garland – cute for a little boys room.

    Reply
    • Kim at Hunt and Host says

      January 28, 2019 at 10:28 AM

      wouldn’t that be amazing!!!! Love that idea 🙂

      Reply
  5. LaVonda Popp says

    January 24, 2019 at 10:07 AM

    Oh so cute and easy to make, so I can make several for friends and family! My husband used to wear a tie to work everyday, and since he doesn’t have to wear them anymore, we have a ton of them, just taking up space. And you have a Downtown Bryan, TX shirt on! (I live in Bryan and love our downtown) Whoop!

    Reply
    • Kim at Hunt and Host says

      January 28, 2019 at 10:29 AM

      yes girl – Bryan is awesome, miss it! You can make so many things with those old ties! Have a blast

      Reply
  6. Peggy says

    January 24, 2019 at 10:14 AM

    I so wish I had saved some of my Dad’s old ties after he passed so that I could always have near my heart!!!

    Reply
    • Kim at Hunt and Host says

      January 28, 2019 at 10:30 AM

      That would have been the best, maybe you will come across some you forgot you had! hope so

      Reply
  7. Cheryl says

    January 30, 2019 at 9:57 AM

    How many strips do you end up with before you fold them over an wrap? Just a ballpark number?

    Reply
  8. Christine Rothenberger says

    March 28, 2019 at 8:22 PM

    I am wondering if the directions are printable. I’d like to save it that way. I have ties in my stash awaiting attention. I was going to make a Christmas tree skirt. Have you seen the book Daddy’s Ties?

    Reply
    • Kim at Hunt and Host says

      March 29, 2019 at 12:36 PM

      I am not sure how to print a blog post, but I think there is some way to do it! What a fun idea, i have not heard of the book, but I will look it up – thanks!!

      Reply
  9. Vandy says

    October 24, 2019 at 7:28 PM

    I’m going to try to do this with my granddaddy’s ties.. He passed way 7 years ago.

    Reply
    • Kim at Salvaged Living says

      October 25, 2019 at 11:01 AM

      Such a sweet reminder! Enjoy!

      Reply
  10. Amy says

    December 29, 2019 at 2:31 PM

    I just found your blog today. Love all that I’ve seen of it so far!

    I read your “Meet Kim” post. I get MY mail delivered in Venus, Texas. 🙂

    I enjoy making tassels out of all kinds of materials (paper, lace, etc.) and I think this one is amazing.

    Reply
    • Kim at Salvaged Living says

      December 30, 2019 at 9:41 AM

      Welcome Amy – I am so glad you are here with us!

      Reply
  11. Brigitte says

    February 22, 2020 at 6:22 PM

    What gauge is the jewelry wire you used? I picked up a bunch of ties at Texas Thrift today. I have some in my craft stash I’ll have to dig out, too, lol! Love these, so cute…and you can put them anywhere you want a little extra…..bling! Or whimsy! Or whatever! 🙂

    We lived in Cleburne many years ago. I miss NTX, but I love my CTX, too, this is “home” for me.

    Reply
    • Kim at Salvaged Living says

      February 23, 2020 at 5:54 PM

      HI! you will have so much fun making these and I also think they will be sute stuck around the house or wherever! I believe I used 20 gauge wire, but often just use whatever I have on hand! 🙂

      Reply
      • Brigitte says

        February 29, 2020 at 2:42 PM

        Awesome, thank you! 🙂

        Reply
        • Kim at Salvaged Living says

          February 29, 2020 at 5:13 PM

          Thank YOU for being here! 😉

          Reply
  12. Rosita says

    February 29, 2020 at 8:45 PM

    Love this idea…Thank you! I actually bought one of those rag necklaces …so neat to think I can make one myself. ~Blessings!

    Reply
    • Kim at Salvaged Living says

      March 3, 2020 at 12:39 PM

      yes you can!!! have fun!

      Reply

Leave a Reply Cancel reply

Your email address will not be published. Required fields are marked *

This site uses Akismet to reduce spam. Learn how your comment data is processed.

Primary Sidebar

  • Email
  • Facebook
  • Instagram
  • Pinterest
  • Twitter

Hi! I'm Kim. I believe getting your hands dirty can be a way to get your heart clean. This blog is a decorating and DIY guide to seeing God in the details of your day, hobby and home. Read more...

Learn to grow a creative business with Kim from Salvaged Living!

Check these out:

  • DIY Projects
  • Faith
  • Home Decor
  • Lifestyle

Stay Connected

Don't miss out on the latest.

By being included in our newsletter delivery, you consent to receive new post updates and occasional promotional emails related to the Salvaged Living family. We promise not to over stuff your inbox!

Stay connected

Don't miss out on the latest.

Footer

You might also like

Mix vintage and dollar store finds for the perfect garden tablescape, feel like you are dining at a gorgeous garden party every night and it's inexpensive! #dollarstorediy #dollarstoretable #99centstoreDIY #99centstore #99centstoredecor #vintagegarden #vintagetablesetting #swandecor

Vintage Garden Tablescape

The perfect craft apron from fabric scraps, old clothes and linen closet toss outs. An easy pattern idea for how to make an apron from a shirt. This apron even has a cell phone pocket and hammer loop.

Purge to Project: Apron from old Dress Shirt

Photography is worth investing in yourself. Just look at the progress in these pictures from learning and practicing photography!

Up Your Photography Game

Learn how to make a free monogram on your Cricut for amazing personalized gifts and home decor. I am sharing how to monogram pillowcases for kid's bedrooms on this DIY Cricut video tutorial. You will learn step by step how to monogram with free fonts, the perfect project for Cricut beginners. #cricuttutorial #mn=onogramideas #howtomakemonograms #cricutbeginnerproject #cricutprojectidea #cricutgifts

Cricut Free Monogram Tutorial For Beginners

Books by Bloggers Gift guide. Buy the book then follow your favorite authors on their blog!

The Perfect Gift Shopping Guide Round Up

© Kim Jones and Salvaged Living, 2019. Unauthorized use and/or duplication of this material without express and written permission from this blog’s author and/or owner is strictly prohibited. Excerpts and links may be used, provided that full and clear credit is given to Salvaged Living with appropriate and specific direction to the original content. Please only use one picture with a link back unless individual permission is given otherwise by Salvaged Living. Full disclosure here.

© 2021 Salvaged Living