Slowly but surely I am layering elements I love into our dining room. It’s one room I don’t feel anywhere close to finished with in our home. When I decided to forgo eating in the “breakfast nook” of our kitchen and turn it into a sitting area, that meant the dining room would become our sole eating spot. We LOVE using our dining room for mealtime! 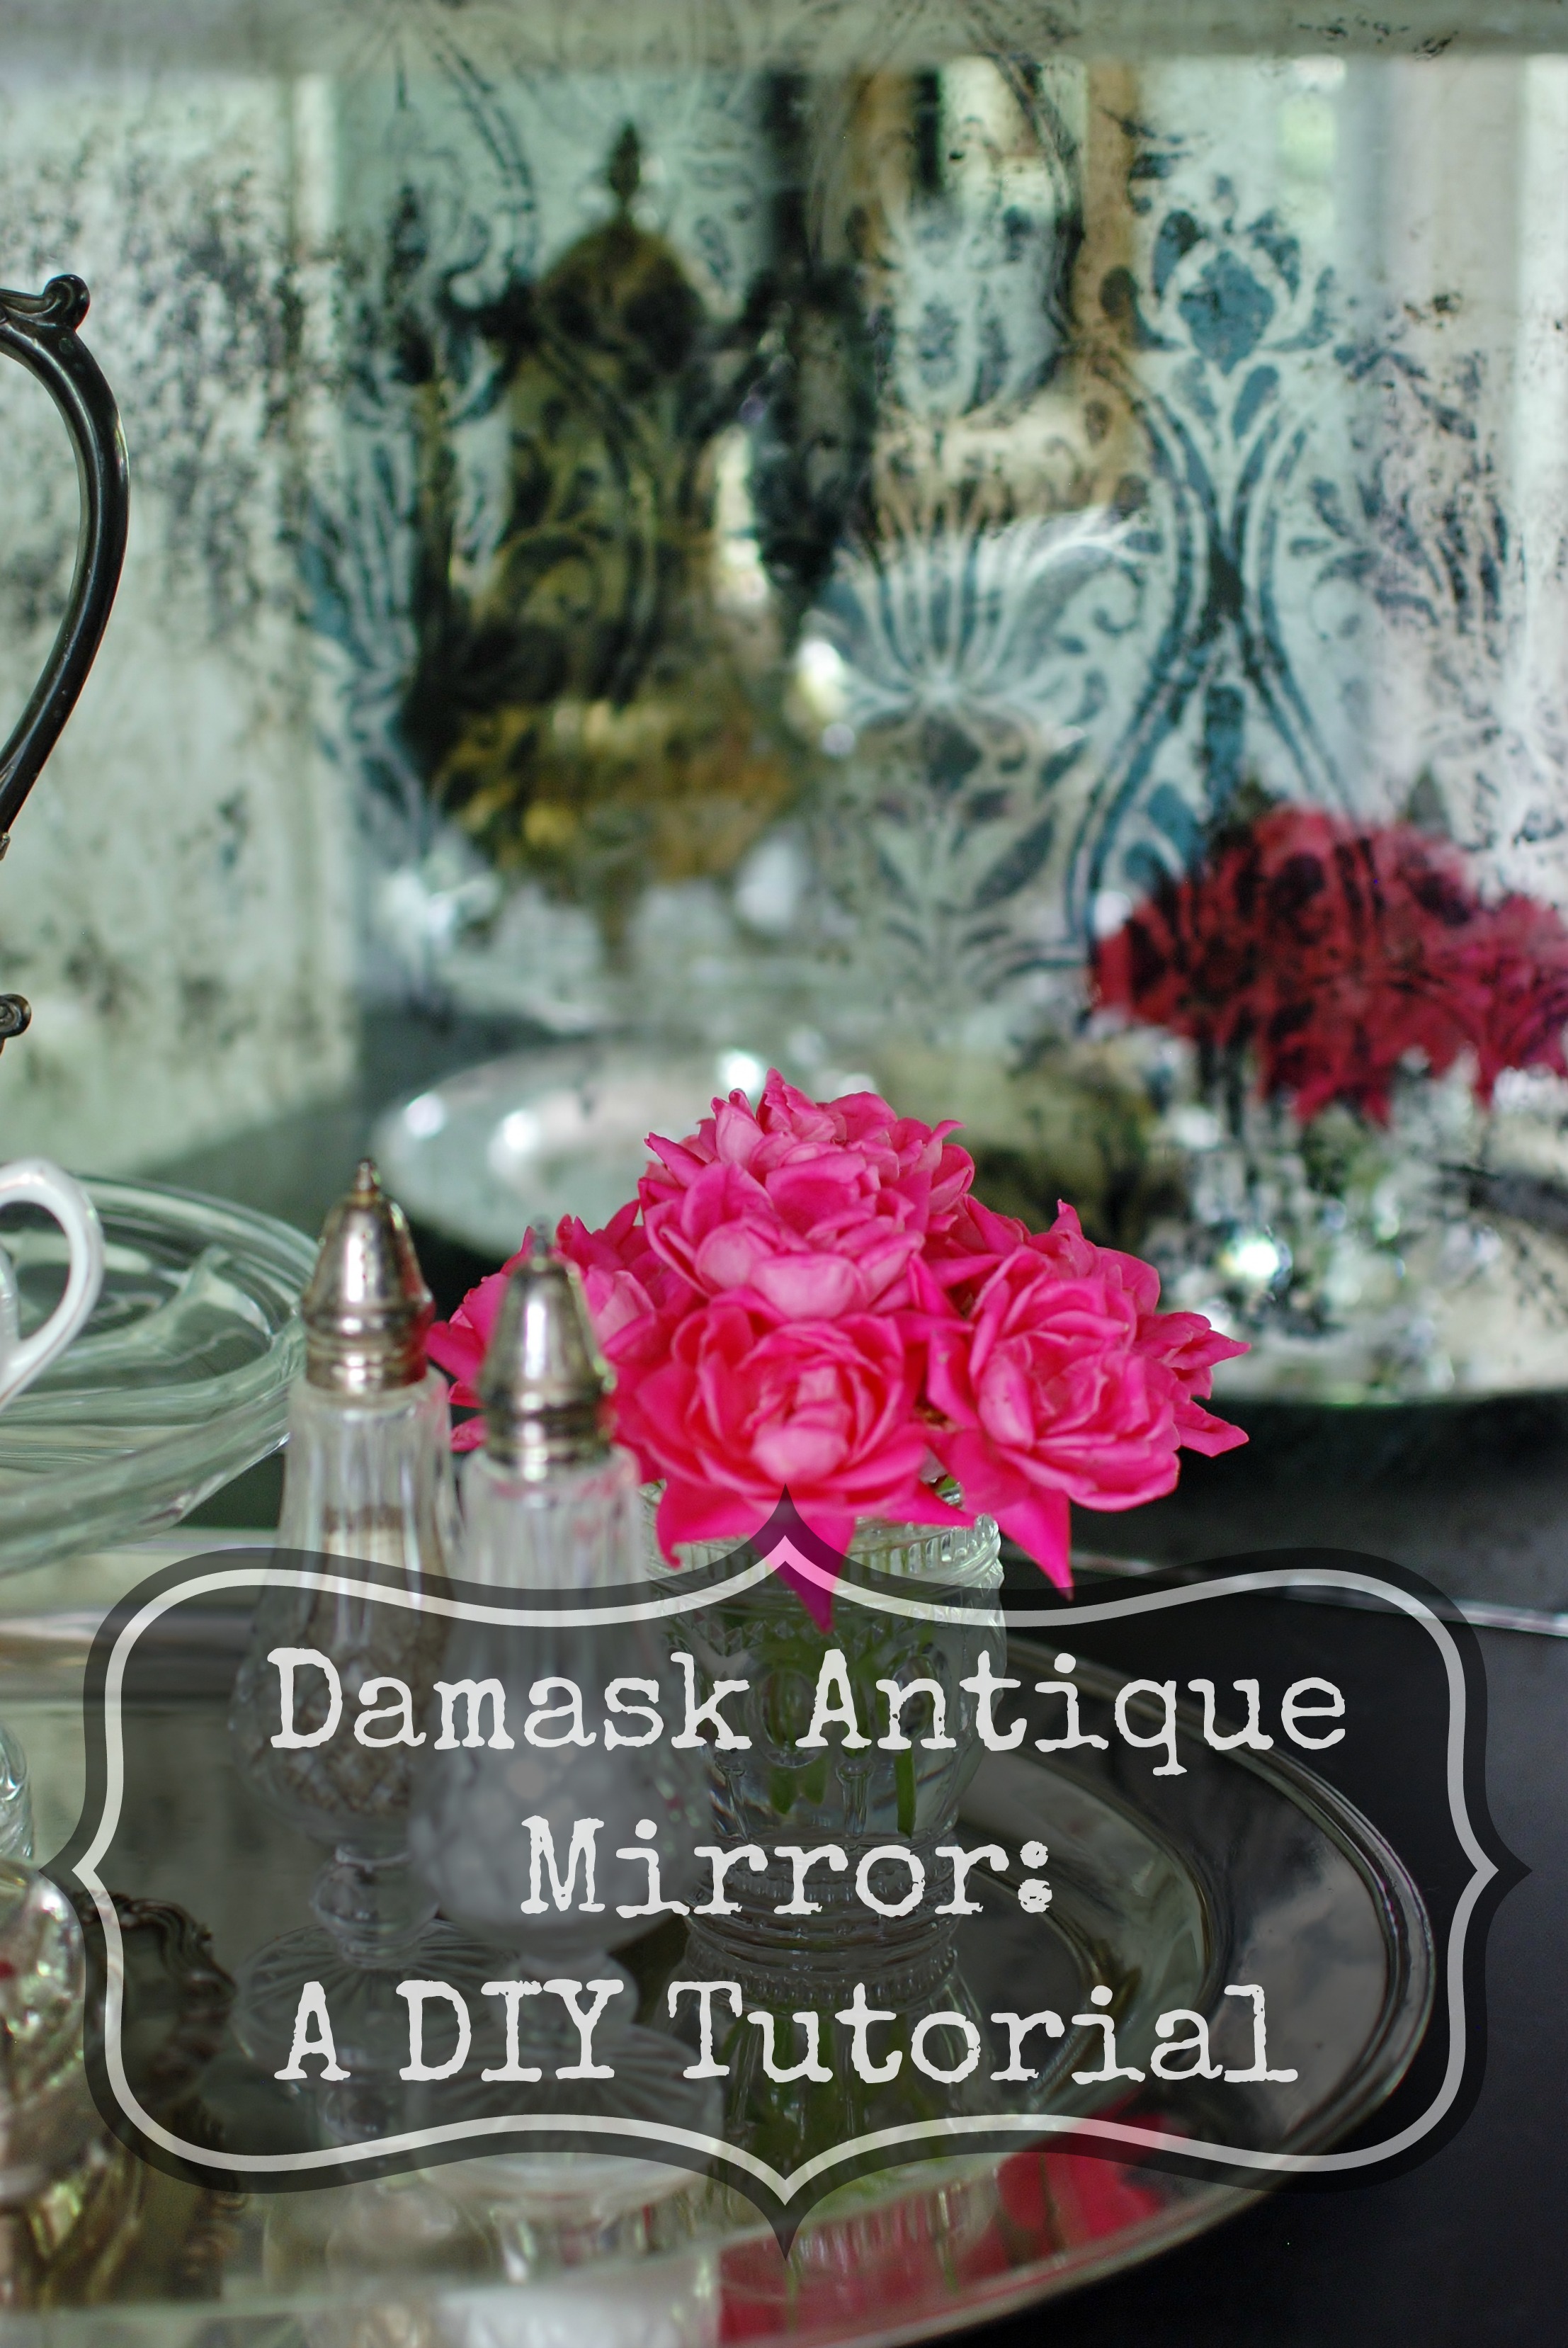
My husband and I just said the other day we would probably never have two eating areas in a house again. The dining room is such a beautiful area that was going to waste, not getting used! I started transforming the room by painting an accent wall black. But there is more to do!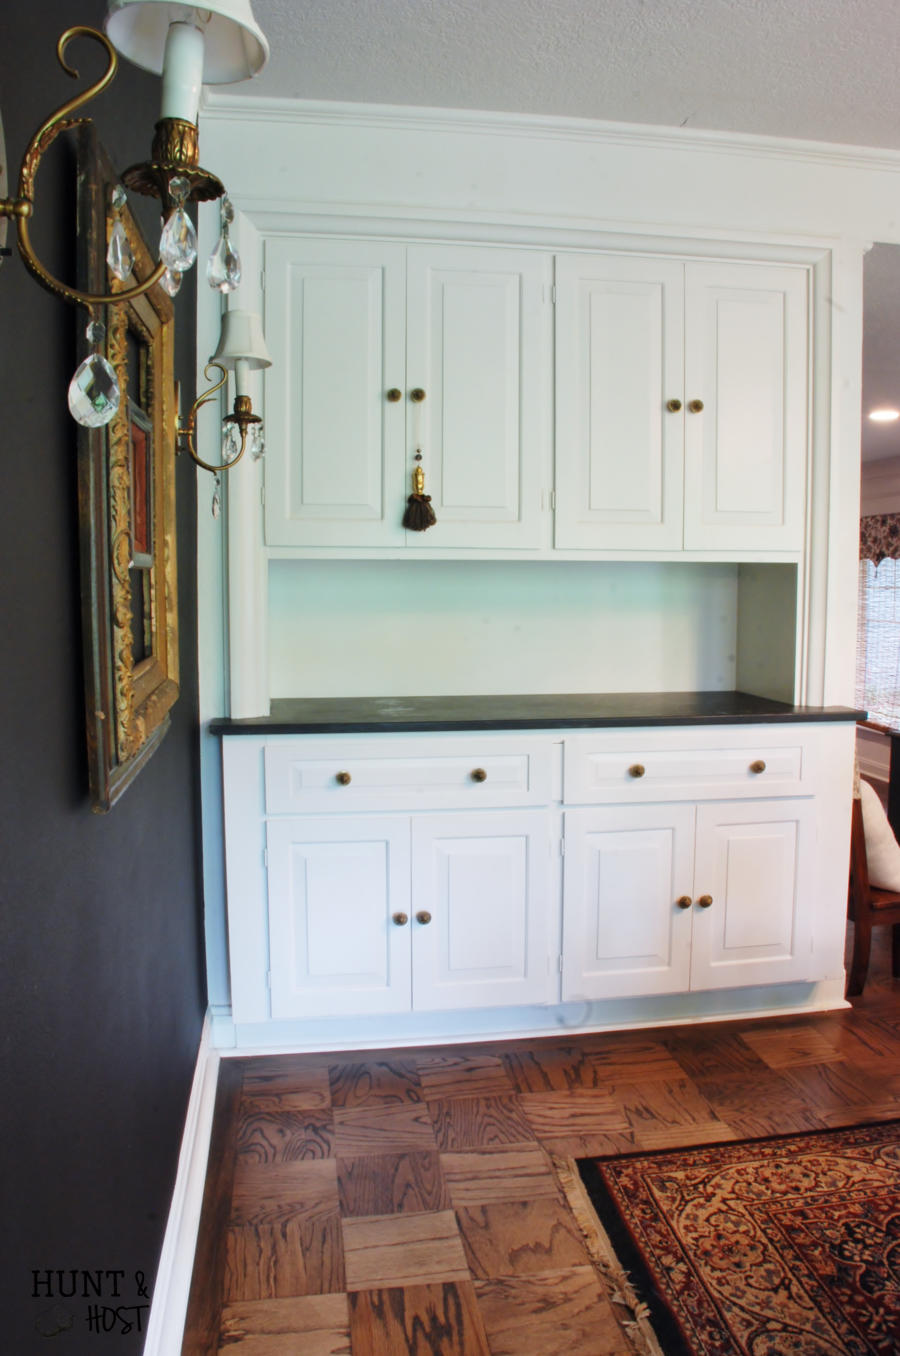
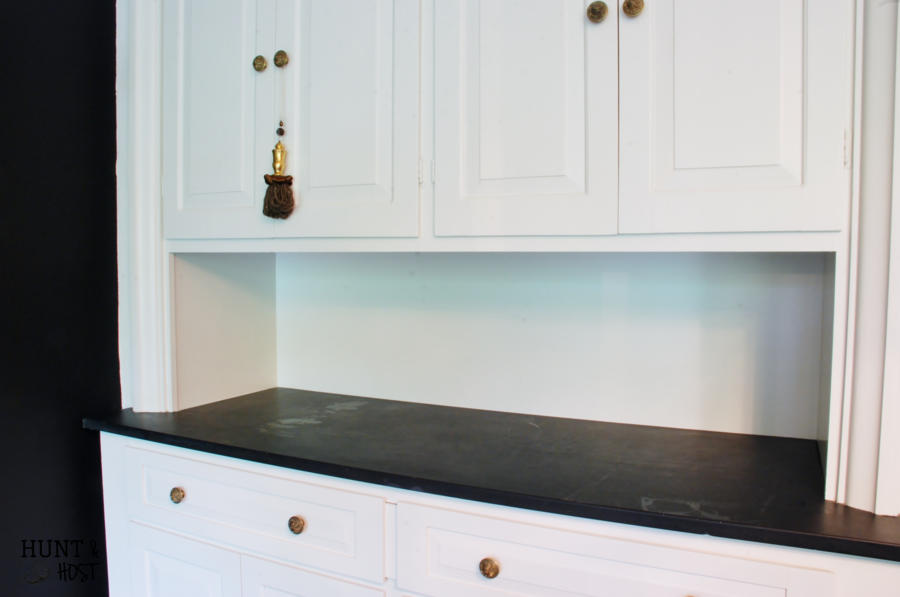
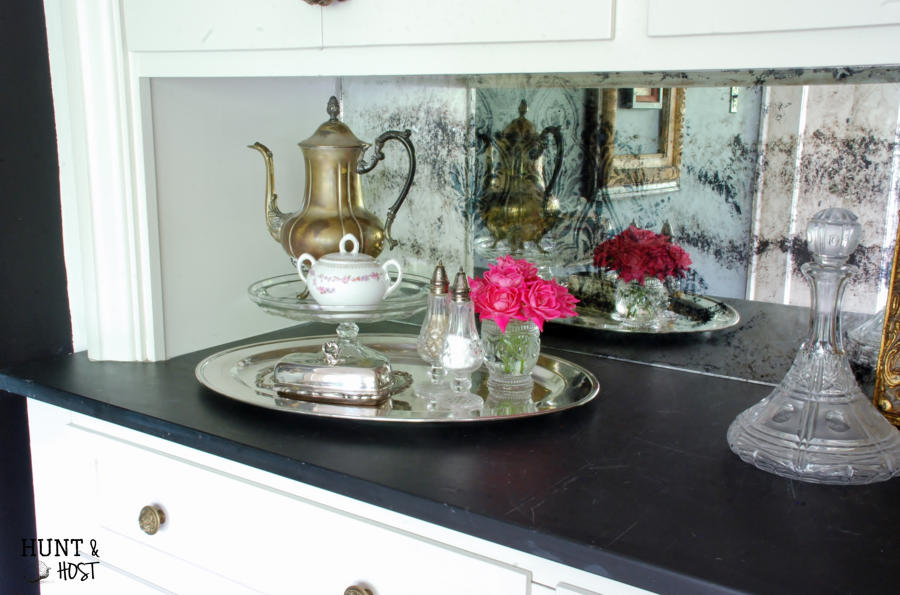
There is a nice set of built in cabinets that resemble a china hutch in the dining room. The counter space is covered in black soapstone, which is so elegant, but the backsplash is plain old painted wood. For a while I’ve had a vision of an antique mirror backsplash. Last summer while attending a conference I walked up to Amy Howard’s vendor booth and felt like she plucked the dream right out of my head. There on her table was the most stunning piece of damask antique mirror. I knew it was the exact thing I had been holding out for!
I contacted the Amy Howard team recently and they sent me the supplies needed to replicate this gorgeous look at home. I’m so thankful! I learned so much about Amy at that conference and through her book, A Maker’s Guide. Her story is a good one, filled with glory for the Lord. Her products are sincerely some of my favorites.
 Here is the part of my story where an epic Pinterest fail moment happens and complete honesty strikes. This project started off so wrong! I called to have mirror cut and was told it would be WAY over my budget, so I decided to buy mirror tiles and cut them to fit. I spent half a day cutting mirror. If a broken mirror brings you 7 years bad luck, I’m in for a life sentence.
It was rough. FINALLY I got it all cut and was beginning to think I was pretty crafty. 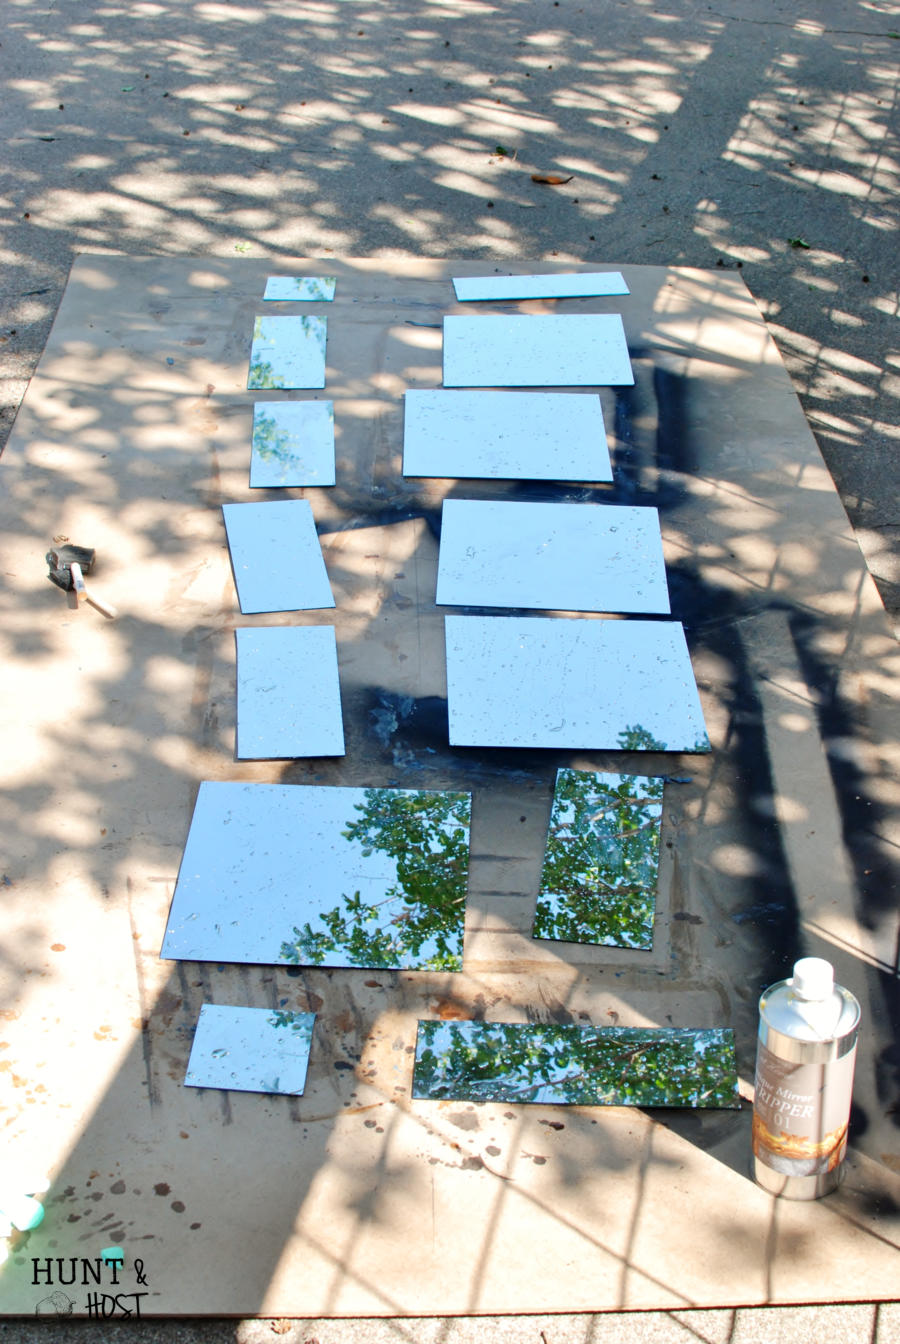 Next, I started the process of striping the back of the mirror. Worked like a charm. Then I moved to the next step. It didn’t work. SAY WHAT!!!??? Yep, hours down the drain because I didn’t test my mirror first and make sure it was REAL mirror like Amy specifically says to use!
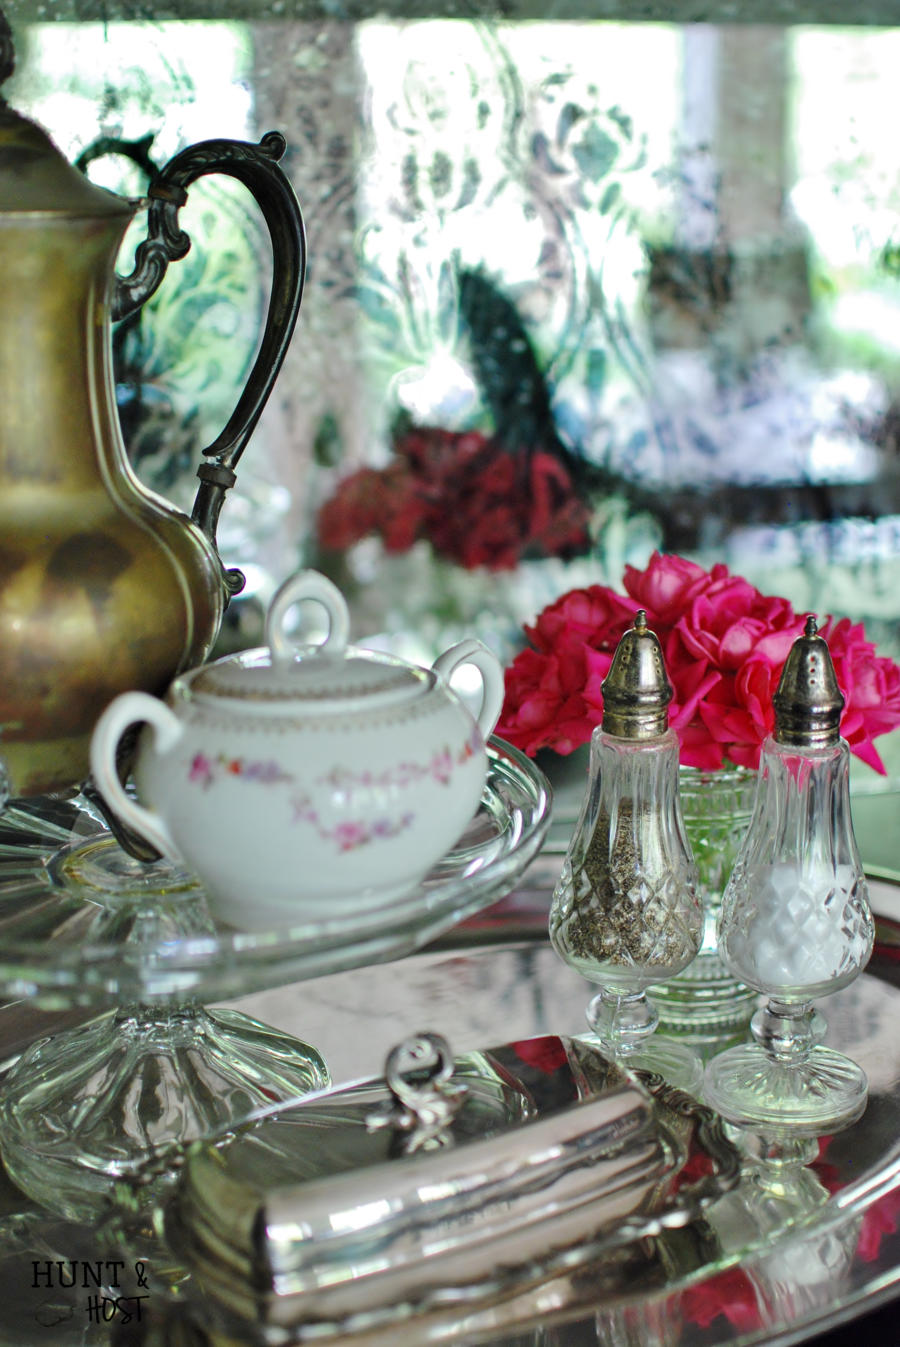
But God is always so good to me. In a crazy fit I decided to look online one more time for a different place to buy mirror. Low and behold a new place popped up. I could promise it wasn’t in the list the first time I was exploring options. I called them and the price was on target. Not only was the price right, but they were the nicest people ever, so helpful and knowledgeable! PLUS I got the mirror in one piece, which is what I originally wanted. Mistakes happen, but often for our good!
Now for info on the RIGHT way to do this project:
Here is a supply list with affiliate links*** to the products in case you want to try your own damask antique mirror!
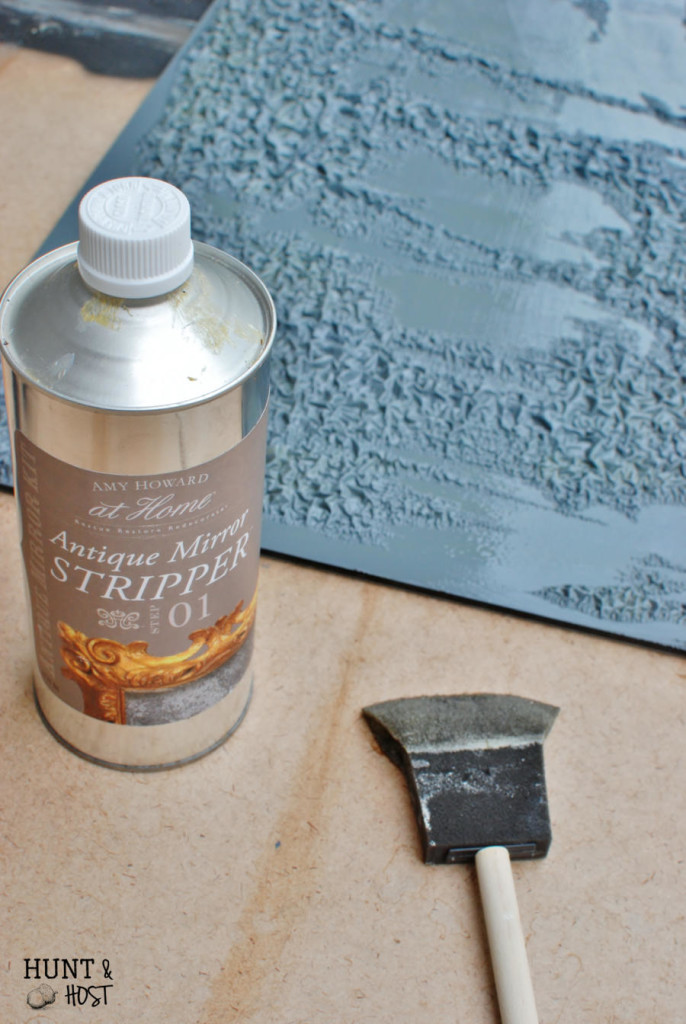
Amy Howard’s Antique Mirror Stripper (solution 1)https://amyhowardhome.com/store/antiqued-mirror/antique-mirror-stripper/ref/kimstetjones/
Amy Howard’s Antique Mirror Solution (solution2)https://amyhowardhome.com/store/antiqued-mirror/antique-mirror-solution/ref/kimstetjones/
Amy Howard’s One Step Paint (I used Black)
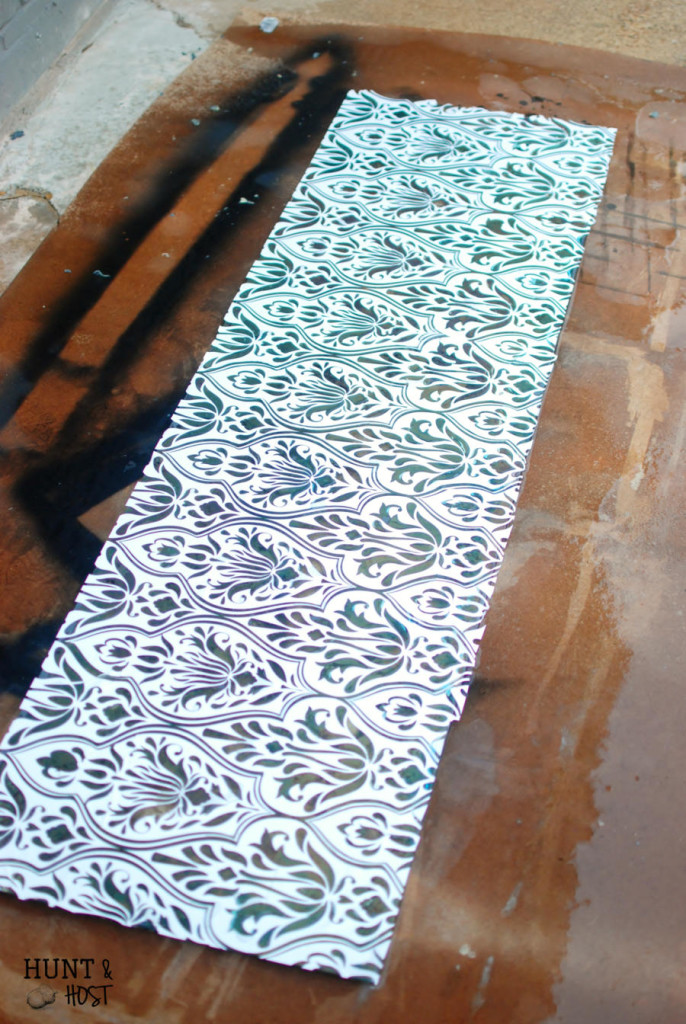
Amy Howard’s Damask Stencil – you’ll need to ask about availability!
Craft Paper
T-shirt rags
Stripping gloves
Sponge Brushes
Empty spray bottle
Scissors
There are a few basic steps. You apply solution 1 to remove the grey backing. Once it is all bubbly like below, use craft paper laid flat on the grey matter and peel it back to remove the paint backing. Wash with Simple Green and water.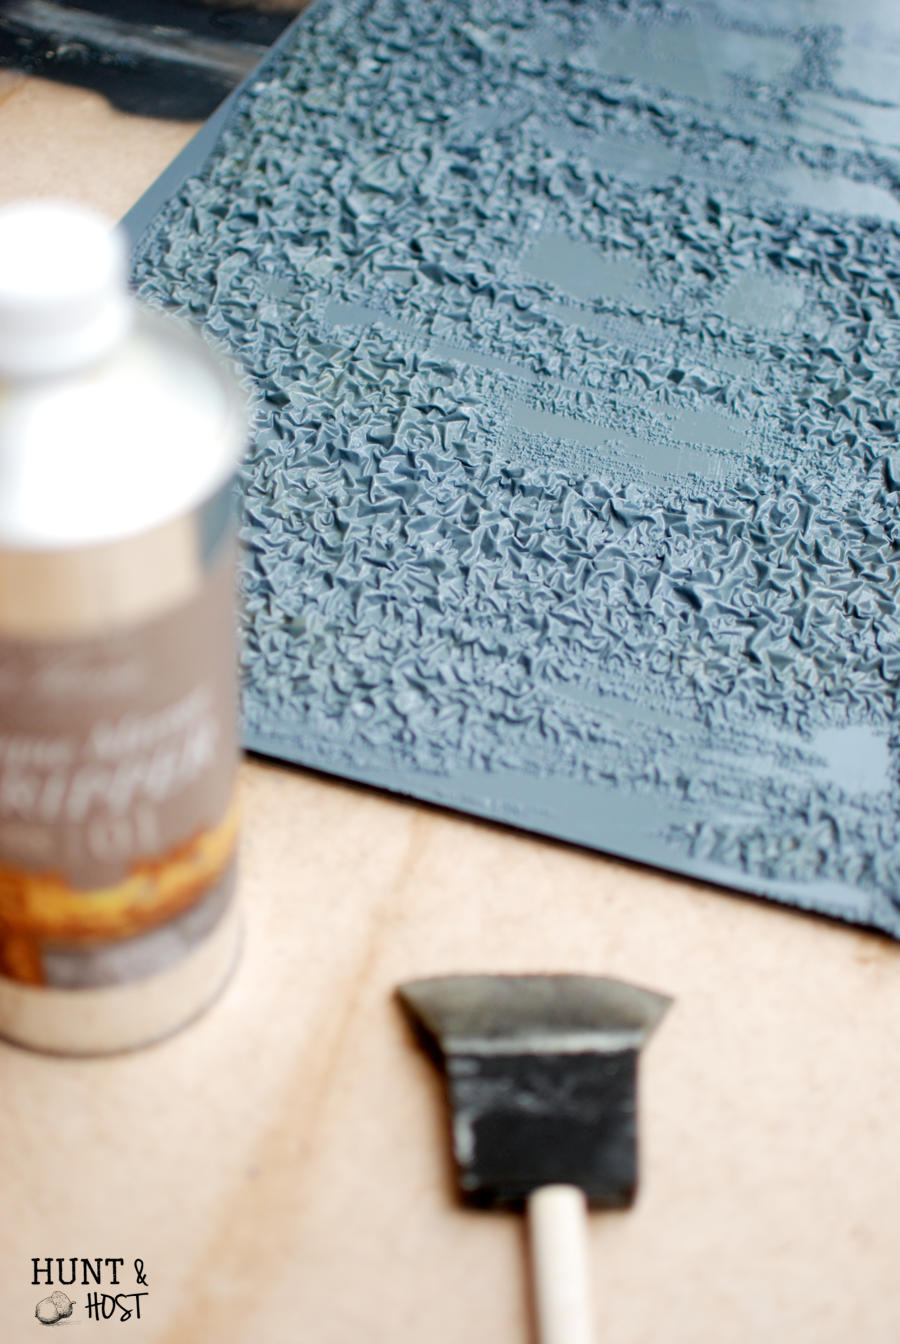
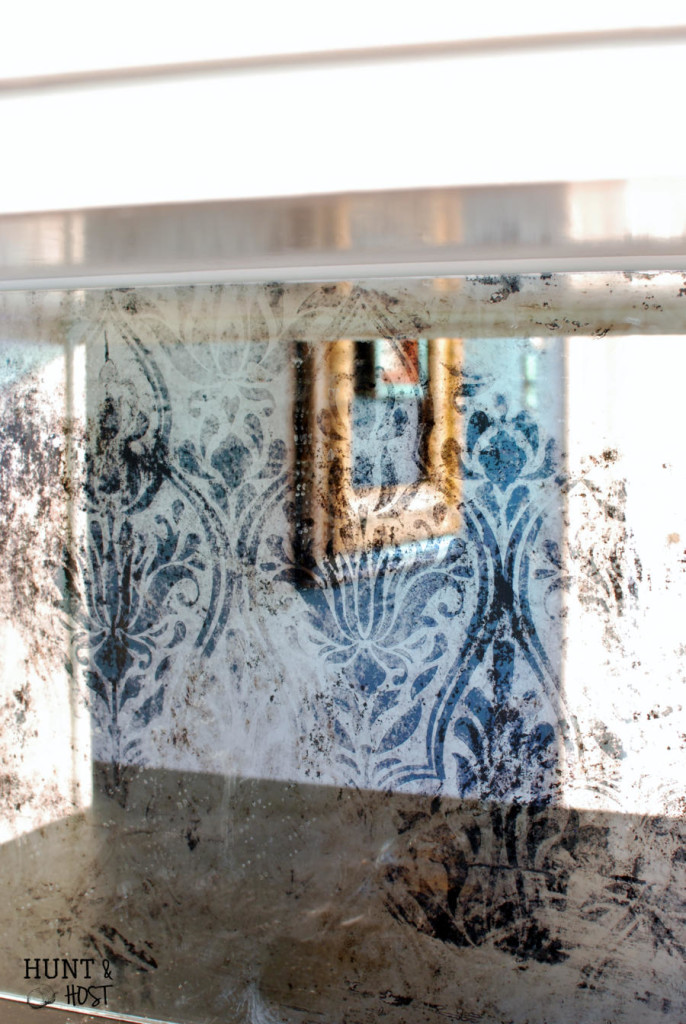
With a clean t-shirt rag you will dab Solution 2 all over the mirror, in no particular pattern. Solution 2 begins to break down the silver in the mirror and starts “eating” through causing the antique effect. This is where you know you have the right mirror..it will turn all kinds of brilliant colors. I suggest working in sections for a large mirror. Rinse with plain water.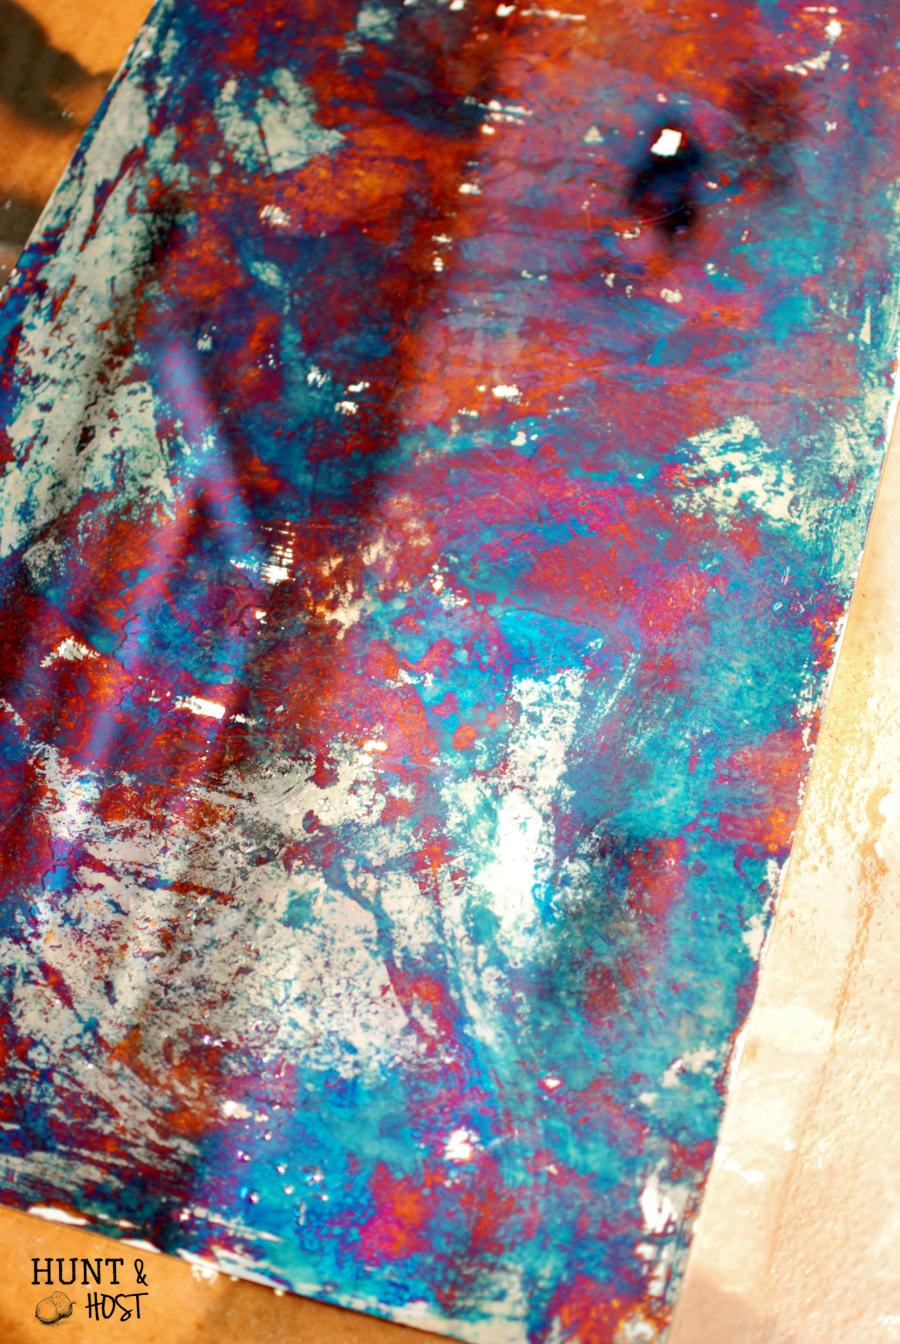
If you are going to stencil the mirror on top of antiquing it you will now add the adhesive stencils to the mirror. The stencils come in 12 X 12 sheets of non-permanent adhesive backed designs. Add more of solution 2, this time spraying it on to etch the stencil design into the mirror. Rinse with plain water. You finish by painting the back to seal it. I used black paint, but you could add a colored paint for extra interest.

Honestly, Amy has the best video tutorial and I can’t explain the process better than her, so I highly recommend watching the video. She has a multitude of good tips. I do however, want to add a few things I learned that will help make this project successful for you!
- She says it and she means it – you have to use REAL mirror. I had no idea there was such a thing as different types of mirror, but there is and I tried the wrong kind first! Test your mirror. Do this by using solution 1 to remove the grey backing then use solution 2 and make sure a reaction starts. When I tried this process on the wrong mirror solution 2 literally did nothing. It should start turning black/blue and oxidizing. If nothing happens you need to get different mirror material! (see photo of step two above)
- Have extra sponge brushes on hand. The stripper solution will eat through your sponge brush and if you have to do the process a few times to remove all the grey backing a new sponge brush would be nice. Consider it ruined though, because sponge brushes will not return from this project!
- It took me more than one time to get all the grey material off the back of the mirror. Some of it was stubborn, so count on a few tries!
- Stripping gloves would be a bonus. The solution is strong and you don’t want to get it on your skin, it burns and stings, don’t ask how I know.

- I let the mirror strip to much. This is the biggest tip I have!!! When using solution 2 I left it on for too long. It was great for antique mirror, but too much for the stencil. When I added the damask stencil and used more solution some areas where already stripped so much that the stencil didn’t really show up. This was disappointing for me! I really wanted a strong damask pattern and only got it in a portion of my mirror. I still think it looks great, but if I did the project again I would use a little less time on the first pass of solution 2 and more time while the stencil was on. Again if possible, testing a smaller mirror lets you get the feel of the process.
- The stencils are slightly repositionable, but they will strip a little bit of the mirror when lifted. This is another reason to not strip as much on the first go round, your stencil is going to pull some mirror off on it’s own. The stencils are also for one time use, just a heads up! I am guessing you could design and cut your own stencils with a vinyl cutting machine, like a Cricut. I haven’t tried this, but I might!!!
- The solutions are expensive, but they will cover ALOT of mirror transformations. I basically did this size space twice because of the mirror mess -up and I still have enough solution that it could be done one or two times more! This project was roughly 54 1/2″ X 16 1/2″.
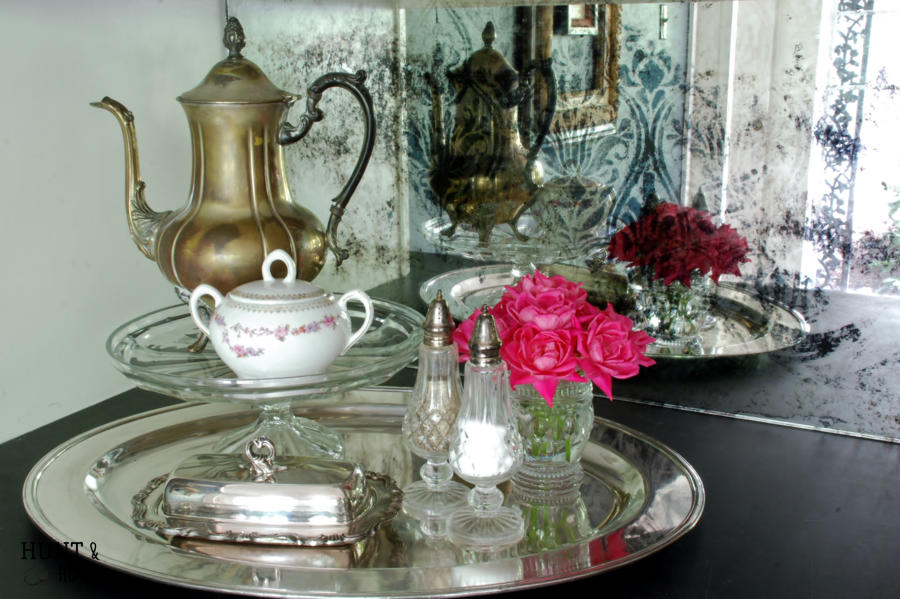


I am thrilled with my new damask antique mirror, it’s exactly what I was thinking, even if I wish the pattern showed a little stronger. Overall the process is very easy and I hope you can learn from my experience. I really feel the photos don’t do this project justice, it is hard to capture on film (at least for this amateur picture taker!) This application could be amazing for so many home projects. Be sure to check out Amy Howard at Home to see what others have come up with using her exquisite line of furniture refinishing products. Let me know if you give this project a go. I’d love to hear how it turned out and if I should add any tips to my list. Stay tuned for a few more updates coming to the dining room!


Stunning! And I love the drama wall too. Your room is turning out beautifully!!!
It’s coming along! Can’t wait to have all the main parts complete!
I love this!! I saw a mirror to an antique dresser done similarly, but she applied floral napkins to the back I believe. Yours is stunning with the damask stencil!
wow – That sounds awesome, I would love to see that!
That turned out absolutely beautiful. So unusual and gives such character to your room!
Thank you – It is such a fun technique
Gorgeous! Now I am looking for somewhere to incorporate that into my home! Great job!
Let me know if you find a spot! I would love to see it!
I think it is perfect!
Thanks 😉
I L.O.V.E. this!! I mist find somewhere that I can do it in my home. MUST! I like that your damask pattern is sparse, It looks even more antique that way. Great job and perfect for that space. 🙂
gwingal
Yes! Let me see pics if you do it! The sparseness does add to the vintage feel, I’m going with it 🙂
Hey there, over here from apt therapy. Great job on the backsplash!!! What an awesome project! I was wondering if you could share the site you got the reasonably priced real mirror from. Thanks -Orea
Hey – thanks for stopping by! I actually got it from a local mirror place, not online. Unless you live in the area I can’t help much, so sorry! I suggest calling around till you find a fair price. Good luck!
………it looked like you’d lost another mirror when it turned tie-dyed colors! It turned out very authentic and even MORE authentic with the peelie damask added. My favorite thing though are the “out takes” and your very fun explanations.
lol…It is a weird process for sure and I went through some trial and error, hope it helps someone get it right the first time!
Love this idea! I have distressed mirrors and the process looks pretty much the same, except no stencil. FYI: I used Citristrip to remove the backing, and Muriatic Acid for the antiquing. Worked like a charm!
Wow – love the alternative choices for the process! You can cut stencils on a Cricut or Silhouette too…great idea, thanks for sharing!
What a good idea to add this to the back of your built-in cabinets. It is so pretty. It looks so much like mercury glass which I love. Thank you for sharing.
Thanks Bonnie – it is one of my favorite projects, I just love it
you could always ask a mirror maker to do one the opposite way by starting with clear glass, be a lot easier and you can do it on toughened glass to use behind the stove, i make hundreds of them here in Australia. there people in america doing it in various ways, you can stain the glass first and get patterns that way, its almost endless the possibilities., clever though the idea but the chemicals are not real friendly , a professional is a good option.
Thanks Ian – that is a great suggestion. Since doing the projects myself is part of the thrill for me I love these products. I would love to see your work, I am sure it is amazing! To bad you are so far away! So glad you stopped by.
GORGEOUS! I’m inspired by your beautiful work! I’ve been looking for ideas online for some time, especially vintage/antique mirrors, mercury glass, mirrored tiles, diy mirror antiquing, and love your idea! Damask is a favorite of mine and that pattern is delicate with the antiquing. It looks rich, yet understated. I think it’s a winner! I’m going to have to try that for my backsplash! Thank you for the awesome idea!
Thanks also to the persons with the good ideas in the comments section. I like the Citrus stripper, because it isn’t so harsh and has a somewhat pleasant citrus fragrance.
I may try the stencil right after removing & cleaning the paint from the mirror back & then afterwards may do a little antiquing. Hopefully, that way, the stencil pattern will show up well & I can control the antiquing & keep a clear but slightly antiqued stencil pattern.
I’m so glad you like the project Gail, It is a favorite of mine too! Thanks for stopping by 🙂
I use mirrors in a lot of my own projects. I have found that the cheapest place to buy large mirrors are at thrift stores. They are usually 70’s ugly but I just can’t pass up a large cheap mirror. I just take out of the frames and take to my local hardware store where they cut glass for window panes and they will cut it to my desired size for a few dollars. Beware that if it breaks they are not responsible! Fixer Upper also just done a show featuring how to turn plain glass panes into antiqued mirrors super cheap and easy. Pam
Great idea and I have a few thrift store and garage sale mirrors, they really are a steal!
ADD ME…
to the list of gals inspired to add an antique-looking mirror in their own homes. You’ve opened our eyes to the gracious impact to be made by a mirror that’s received this Cinderella treatment, and we thank you.
so glad you like it, I really love this application and want to do it more somewhere else!!!
Is there a specific type of adhesive stencil I should use or would any one work?
I would go with more of a repositionable type adhesive, like a contact paper. You can cut the stencils yourself if you have a Cricut or Silhouette machine, I cute one time use stencils out of contact paper! It needs to be adhesive though so it will seal, but you need to be able to pull it off too.
why use a mirror? would not just a piece of glass work just as good?
you wouldn’t get the mirror part, but you could paint glass and use a stencil, that would be pretty. Just a totally different application!
Can you use any adhesive stencil or does it have to be one of Amy Howards?
you can use any adhesive stencils, even ones you make yourself with a cricut or something. Just be sure to use more of a contact like paper that is not so permanent!
Fabulous! Love your backsplash. Also intrigued by the floor. Did you create those wood tiles? Do tell.
Hi Kim,
I loved how you did this! I have a similar area in my kitchen that I plan to do.
Would you please share how you adhered the mirror backsplash to the wall. Specifically I would like to know if you put anything in-between the mirror and the granite counter top. Or is the mirror just resting on the granite counter?
I’d appreciate your advice.
I used a construction adhesive to attach to the wood panel that was installed and the glass just rests on the counter. You could attached with mirror clips but make sure you measure the space accordingly, they will take up some room and not allow the mirror to fit as seamless
Thank you!
Hi Kim!! Thank you for sharing this. I love this look. I will probably have to read it 3 more times so I don’t miss a step. It turned out amazing.